
In this blog post, we’re kicking off a series of concise tutorials that dive into the ins and outs of using the CameraPixels app, a powerful photography tool tailored for iOS users. While CameraPixels offers unmatched versatility and control, it may initially seem a bit complex. Our aim is to guide you through these tutorials, helping you harness the full photographic potential of CameraPixels on your iOS device.
Upon installing CameraPixels, you’ll encounter a crucial step during your first app launch – granting necessary permissions. While not all permissions are mandatory, disabling some of them will limit the app’s capabilities. During your initial CameraPixels launch, you’ll be prompted to allow or deny the following permissions:
- Camera – an essential permission. If you disable this, CameraPixels will become unusable, and you’ll see a black viewfinder.
- Photos – another must-have permission. Without it, CameraPixels won’t be able to save the photos and videos you capture. You’ll notice the absence of your media in the camera roll if this permission is turned off.
- Microphone – though not mandatory, it’s semi-required. Disabling this permission will prevent CameraPixels from recording audio during video capture.
Additionally, the Location permission is requested only when you activate the Location feature in CameraPixels’ settings page. This permission enables CameraPixels to embed location information into your captured media. If you decide to turn it off, the app won’t utilize location data in your photos and videos.
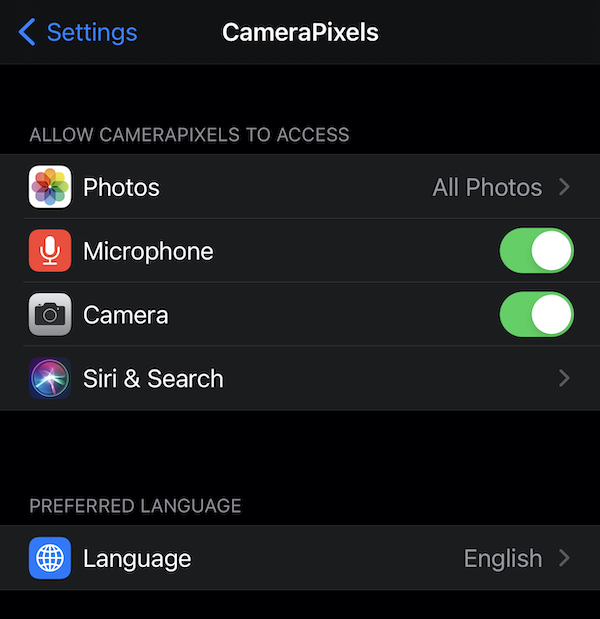
If you’ve either turned off a vital permission or just want to check the status of permissions granted to CameraPixels, you can do so through your iOS device’s Settings app. Navigate to the Settings app and scroll down until you locate CameraPixels. Once you’ve selected the CameraPixels item, you’ll find a comprehensive list of all the permissions configured for the app:
Basic elements of the User Interface
CameraPixels follows a familiar and user-friendly User Interface (UI) layout, akin to many other photography apps.
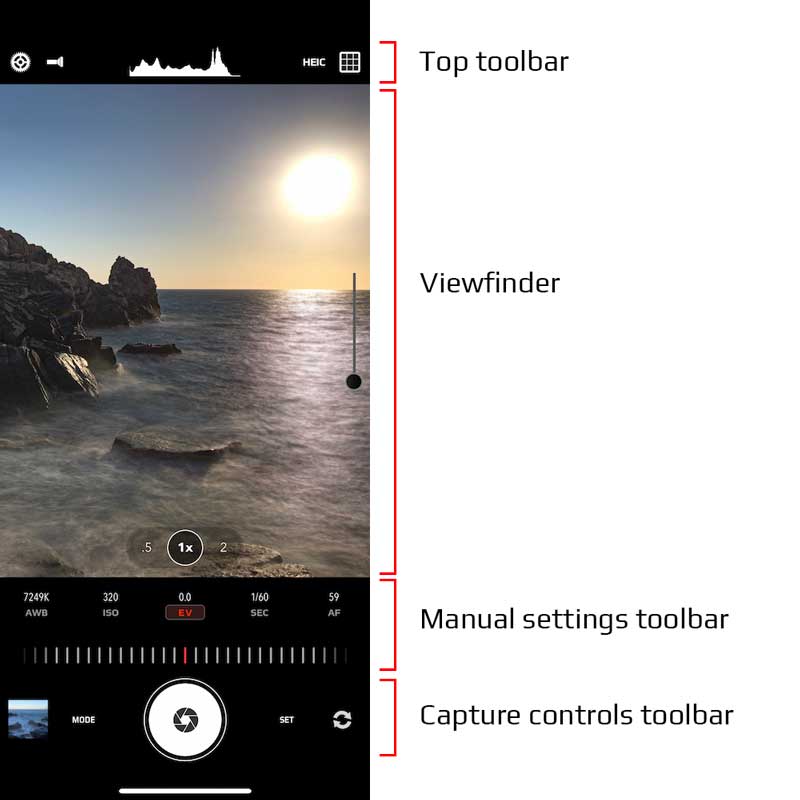
The screen is logically divided into four distinct areas, making it easy to navigate and use:
- Top toolbar: this essential section houses frequently used controls that you’ll want to access easily. For instance, you can quickly check the status of your device’s flash and output media format to prevent any unexpected surprises.
- Viewfinder: the primary area where you’ll frame and capture your shots.
- Manual settings toolbar: this toolbar provides access to various manual settings, allowing you to fine-tune your photography experience.
- Capture controls toolbar: in this section, you’ll find controls and options related to capturing photos and videos.
Top toolbar
Within the top toolbar, you’ll discover controls that are conveniently accessible and frequently used right on your screen. This area ensures you can swiftly check vital information, such as the status of your device’s flash and the selected output media format, preventing any unwelcome surprises during your photography sessions. Moreover, from the top toolbar, you can effortlessly access CameraPixels’ global settings and choose from different grid types to enhance your framing and composition.
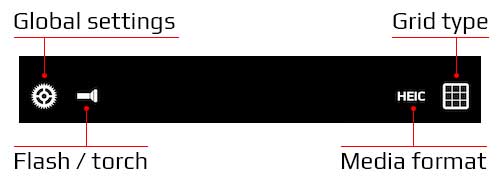
When you press a button on this top toolbar, it seamlessly opens a related popup dialog, like the Flash/Torch dialog, providing access to additional settings and options for a more tailored photography experience.
Viewfinder
The viewfinder serves as your window to the live scene you’re capturing in CameraPixels. What sets it apart is its touch-sensitive capabilities, allowing for intuitive interaction. Here’s how you can make the most of the viewfinder’s features:
- Single-tap with one finger: Easily alter the focus and exposure points by tapping on the screen, provided these settings are accessible at that moment.
- Single-tap with two fingers: This gesture is designed for splitting focus and exposure points, granting you precise control over these critical aspects of your shot.
- Press and drag: When the focus and exposure points are split, performing a press-and-drag action on the corresponding reticle (circle for exposure and square for focus) enables you to reposition it independently from the other reticle. This grants you the flexibility to fine-tune focus and exposure points individually.
- Double-tap: To reset focus and exposure points and set them to auto mode, simply perform a double-tap. This feature ensures quick and hassle-free adjustments for your photography needs. CameraPixels’ touch-sensitive viewfinder empowers you to capture the perfect shot with ease and precision.
Manual settings toolbar
True to its name, the manual settings toolbar provides you with the means to take control of your camera’s parameters. You can easily adjust essential settings like white balance, ISO, and shutter speed to tailor your photography experience to your liking.
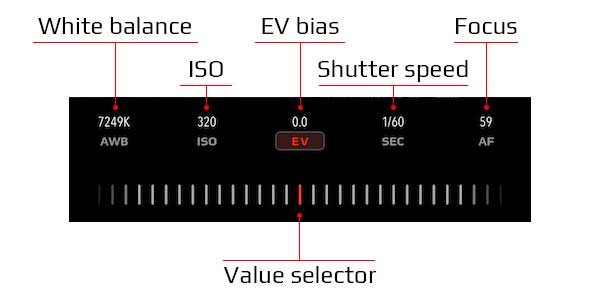
Initially, all settings are configured in auto-mode, with the camera making automatic adjustments based on the prevailing lighting conditions and distance. However, with the manual settings toolbar at your disposal, you have the freedom to fine-tune these parameters to capture the perfect shot, just the way you envision it.
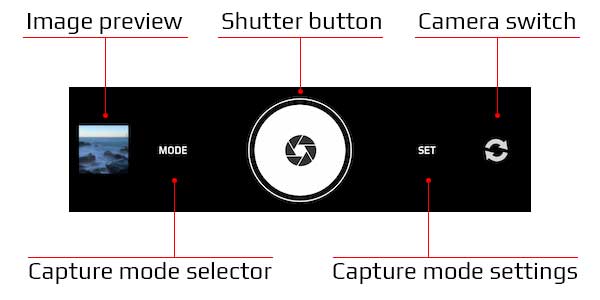
Capture controls toolbar
The Capture Controls Toolbar is your go-to hub for unleashing the full potential of your camera, offering seamless control over a wide array of features and functions. Whether you’re aiming to snap a perfect picture, initiate or halt video recording, switch between various capture modes, or fine-tune your camera settings, this versatile toolbar has you covered. Additionally, you can effortlessly switch between the front and back cameras for greater flexibility and creativity.
Additional elements of the User Interface
Your CameraPixels experience is designed to adapt seamlessly to your settings and device capabilities. Depending on these factors, you may find additional UI elements displayed on the screen to enhance your photography journey.
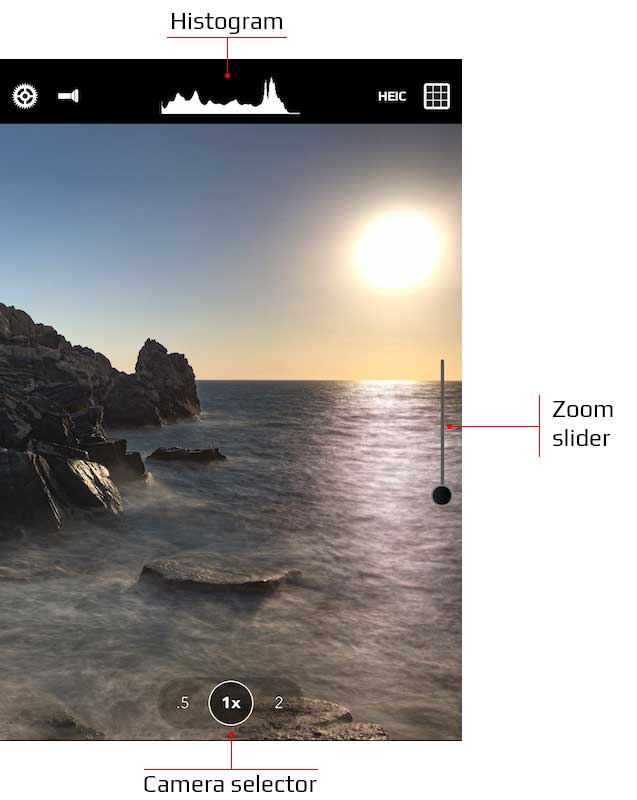
The histogram and zoom slider are thoughtfully enabled by default, ensuring they are readily accessible on your screen. However, their visibility may vary depending on whether your device’s underlying hardware supports these features.
For those wielding dual and triple-camera devices, such as the iPhone 7 Plus, iPhone 8 Plus, iPhone X, iPhone 11, and more, the camera selector becomes available. This feature allows you to switch between the different camera lenses, expanding your creative horizons and capturing the perfect shot for any occasion. CameraPixels tailors its interface to accommodate your specific device and settings, ensuring a customized and user-friendly experience.
Conclusion
In this instructive tutorial, we’ve delved into the essential permissions needed for CameraPixels and the potential constraints that may arise if some permissions are disabled. We’ve also provided you with a glimpse of CameraPixels’ user interface, highlighting the core elements gracing your screen.
As we embark on the next tutorial, we’ll guide you through the process of setting up CameraPixels. This will include selecting your preferred language, accessing the Quick User Guide, and discovering how to reach out to our support team. Stay tuned for a comprehensive guide to make the most of your CameraPixels experience!
I have downloaded the lite version to give it a try and really like it, but there is no option for the 5x lens on iPhone 16 Pro Max? Is that available in the Pro version?
Sorry, there was an error in label of the camera selector. It has been fixed in the latest update
Thank you for the reply. I have the Xs, so no macro lens, just the 2x lens, so 2 lenses.
Then it switches to 1x lens automatically when you move closer to the object. CameraPixels doesn’t use virtual camera since it doesn’t support manual settings
Ok thanks, did you know that the reply button is white on a white background, at least in firefox.
Hmm, no, we were not aware of the issue. The button should have a green background with a white text on it. We’ll check and try to fix it
I have an iphone that lets me have the 2x zoom lens, however I notice that the focus range in the default iphone camera is much closer than CameraPixels, where in one a target will be out of focus in CameraPixels, but in focus with default camera. Why is this?
This is because default camera app uses the virtual camera (which consists of 2 or 3 physical cameras depending on your device) which automatically switches between physical cameras depending on lighting conditions and distance to the object. If you have a triple-camera device one of those is macro lens, which is usually the ultra-wide camera (0.5x in CameraPixels). When you move your device closer to the object, default camera app will automatically switch to ultra-wide camera no matter which zoom level you choose.
Looks very interesting to collect photos for eventual focus stacking with Zerene or Helicon !
1- IS there a way to adjust the Iphone lens apterture ?
2- What is the difference between standard and pro versions ?
Thanks
Hello,
1. No, all iOS devices have fixed aperture
2. There is no standard version. We have Lite (free) and Pro (paid). Lite version has image/video size limitations (max 3.1 MPx) and therefore no RAW/ProRAW support
Hi,
When selecting the 1x lens I’m unable to manually change the ISO nor the shutter speed, they are both greyed out. When switching to the .5x or 5x lenses it is working just fine.
Did I miss a setting which blocks manual operation with the 1x lens?
Cheers, Roger
P.S.: iPhone 15 Pro Max, iOS 17.1.1, CamerPixels v2023.1.0
Hello, regrettably, the manual exposure is restricted to resolutions of 12 MPx and lower. The restriction is imposed by Apple’s frameworks
My zoom bar disappeared. How do I get it back?
The zoom slider disappears in certain modes (like Portrait) or when you select DNG as your output format for images (more like any configuration, that include DNG, so all outputs DNG+JPG, DNG+HEIC, DNG+TIFF, DNG won’t show the zoom slider)
what is the maximum time which can elapse between shots in the intervalometer?
180 seconds
Come posso riprendere direttamente in bianco e nero?
Grazie.
Unfortunately, there is no capture mode that outputs directly Black&White photos. You can always use the Photos app to convert the photo to B&W version
I am thrilled with your new re-written CameraPixels app. It is much better than the previous model. I like these tutorials, as well. I thought I’d give you some feedback as I go through them. In the first tutorial it would be good to better define the “focus” and “exposure” symbols. I had to experiment a bit to determine that the “circle” was the “exposure” and the “rectangle” was the “focus.” Otherwise it is very good.
Thanks………… Tom A
Dear Tom,
Thank you for your feedback, we’ll update the tutorial with some clarifications regarding reticles.
Team Basic Pixels