
In our earlier lesson, we explored the necessary permissions for CameraPixels and gained insights into the fundamental user interface components displayed on the screen. In this tutorial, we will delve into configuring the supplementary elements of CameraPixels’ user interface. We’ll also cover accessing the Quick User Guide and reaching out to support directly within the app.
Global Settings
In our earlier guide, we explored how CameraPixels can display extra user interface elements on the screen. These elements encompass the Histogram, Zoom slider, External Lens Selector, and Camera Selector. Regarding the Camera Selector, its visibility on the screen is automatic and is triggered on devices equipped with dual and triple cameras. On the other hand, control over the presence of the Histogram, Zoom slider, and External Lens Selector can be managed by toggling the relevant settings in the Global Settings dialog of CameraPixels:
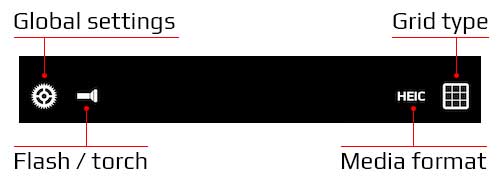
When you click the Global Settings button, a dialog box showcasing various settings will be displayed on the screen:
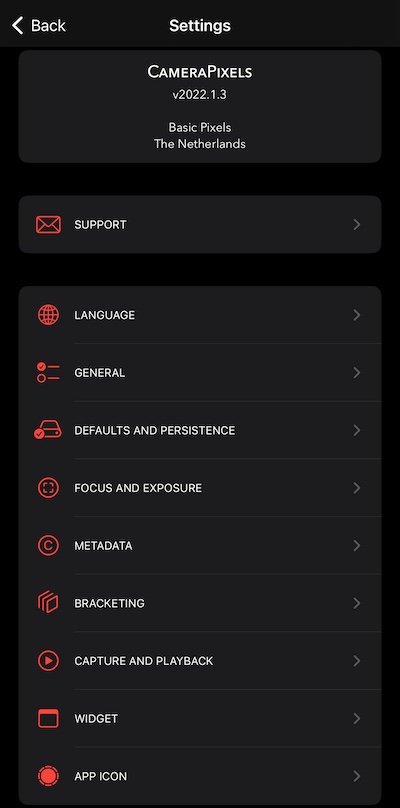
The configurations are categorized into distinct groups, spanning from Support to App Icon. Each setting is accompanied by a concise description to assist you in determining the optimal value for that specific configuration.
Support
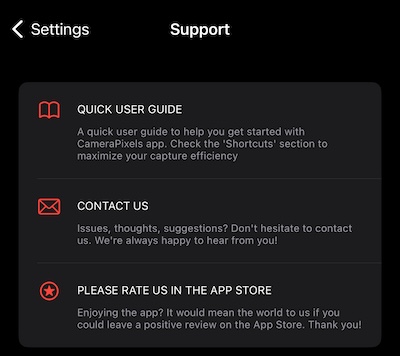
Explore the Support section for seamless access to our User guide or to reach out to our dedicated support team. If you’ve had a positive experience, consider leaving a review on the App Store—use the “Rate us in App Store” option. Remember, please refrain from seeking support through App Store comments.
Quick User Guide. Explore CameraPixels with our handy Quick User Guide. Clicking on this option unveils a concise document outlining fundamental interactions with CameraPixels, complete with valuable shortcuts tailored for advanced users.
Contact us. If you have inquiries, suggestions, or need to report bugs or request features, please utilize this option. It will conveniently open your configured email app, pre-filling the body with valuable information such as your device’s iOS version and the app’s version.
Please rate us in the App Store. Many users make informed decisions about downloading an app by considering fellow users’ feedback. Share your thoughts on the app, highlighting its features, strengths, and perhaps areas for improvement (though you can skip those if you prefer ????). Please refrain from using comments to seek support or pose questions, and instead, focus on creating valuable reviews for the community. Thank you!
General
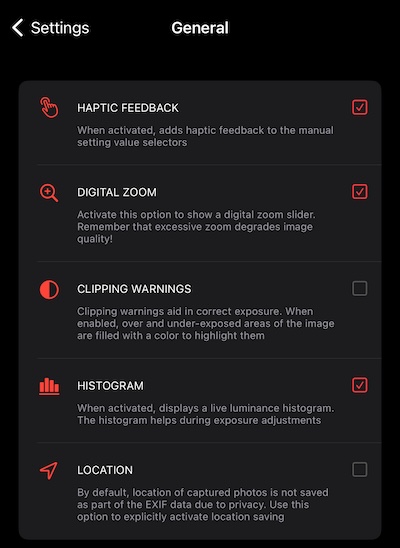
The General section outlines key CameraPixels settings that encompass various aspects not covered in more specialized setting categories.
Haptic feedback. In the era of touch screens, users seek tactile engagement with apps. With Haptic feedback enabled, the manual settings value selector provides a responsive sensation akin to manipulating a physical dial. Notably, in Video Capture mode, Haptic feedback is consistently disabled to prevent interference with recorded audio.
Digital zoom. In auto-exposure mode, leverage digital zoom to expertly frame your subject and still achieve impressive image quality, especially with Image Enhancement activated, thanks to the intelligent SmartHDR/Deep Fusion algorithms. However, exercise caution in manual exposure mode as excessive use of digital zoom can noticeably diminish image quality, particularly at high zoom levels. Keep in mind that digital zoom is automatically disabled when capturing images in RAW format.
Clipping warnings. In situations where a scene exhibits a significant dynamic range, certain areas may become either over- or under-exposed. Clipping warnings serve to pinpoint these specific regions within an image. Enabling or disabling these warnings is conveniently achieved with a simple tap on the visible histogram. It’s important to note that the clipping warnings feature is not accessible in Video and Timelapse capture modes.
Histogram. The luminance histogram is a valuable tool for assessing the brightness distribution in a scene. A histogram with a high concentration of values at either end may indicate suboptimal exposure for the prevailing lighting conditions. In standard photography, it’s advisable to maintain an evenly distributed histogram across the entire range. This practice enhances the overall quality of the image capture.
Location. Many iOS devices come with a built-in GPS sensor for precise location tracking. When the Location setting is enabled, the device stores its current location in the EXIF header of captured images or recorded videos. For privacy reasons, Location is usually turned off by default. It is advisable to disable location tagging before sharing images on social media platforms, such as Facebook, to protect your privacy.
Defaults and persistence

The Defaults and Persistence Group enables customization of the app’s behavior across multiple sessions. By default, CameraPixels initiates in Photo capture mode, utilizing the device’s 1x back camera.
Default capture mode. Optimize your CameraPixels experience by selecting the default capture mode that activates when the Persistent Capture Mode option is disabled. Choose from various Standard capture modes or utilize saved presets to tailor your preferences.
Default capture mode tab. When you press the MODE button, a dialog box will appear, showcasing various capture modes with the default selection of standard modes. If you favor saved presets instead of the default modes, simply choose ‘Presets’ or ‘Last’ to access the list of your most recently used capture modes.
Persistent capture mode. To enable CameraPixels to utilize the most recently employed capture mode, simply activate the Persistent Capture Mode option. Enabling this feature also retains the last-selected rear or front camera.
Persistent capture settings. To preserve chosen settings across all capture modes, enable the Persistent Capture Mode Settings feature.
Focus and exposure
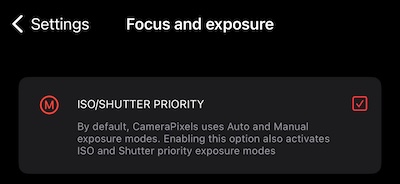
Focus and exposure group currently has a single setting that determines wether CameraPixels uses fully manual or semi-manual mode when ISO or Shutter Speed manual settings are selected.
ISO/Shutter priority. CameraPixels offers two default exposure modes: Auto and Manual. The exposure mode switches to Manual when ISO and/or Shutter Speed settings are chosen. Enabling this feature introduces two semi-manual modes: ISO priority and Shutter priority. With semi-manual modes, selecting either ISO or Shutter Speed will transition the camera into the corresponding priority mode. In these modes, you have control over one setting while the camera manages the other to achieve the best image exposure. This provides flexibility and precision in capturing optimal shots.
Metadata
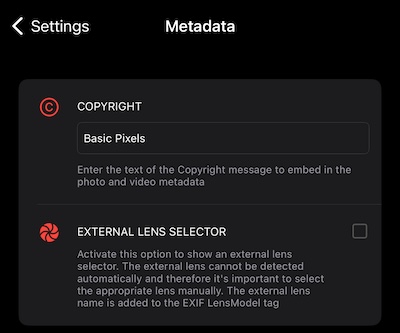
The Metadata options allow to to specify additional metadata that will be store in the EXIF header of the captured images.
Copyright. For professional photographers or individuals who regularly showcase their images on social media, it is advisable to apply copyright tags. Input your copyright message into the designated field provided and it will be stored with each captured photo or recorded video to ensure proper attribution and protection.
External lens selector. In the current era, there is a wide array of external lenses designed for attachment to iPhone or iPad devices. Our External Lens Selector introduces an extra feature enabling users to conveniently pick the utilized lens and automatically store its name in the EXIF header of the captured photo. Given the abundance of brands flooding the market, with new ones emerging regularly, it’s not feasible to exhaustively list all of them within CameraPixels. To streamline the selection process, we have curated a list featuring the most popular brands along with a selection of generic lenses, encompassing a diverse range of choices available in today’s market.
Bracketing
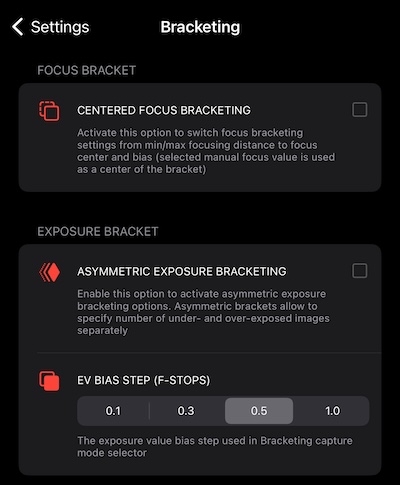
The Bracketing group compiles all settings associated with bracketing capture modes.
Centered focus bracketing. CameraPixels optimizes its Focus Bracketing capture mode by utilizing default min/max focus distances. Users can define both minimum and maximum focus distances, along with the desired number of images. CameraPixels then automatically generates a comprehensive list of focus distances for capturing each image within the bracket. The Centered Focus Bracket option allows to change this process by incorporating the number of images and distance bias between consecutive shots to create a list of capture distances. In this scenario, the manual focus setting value serves as the central point of the bracket.
Asymmetric exposure bracketing. CameraPixels offers a default setting of symmetric exposure bracketing with an odd number of images. However, there are situations where an asymmetric bracket is preferred, featuring a distinct number of exposures for both under-exposed and over-exposed sections. Activating the asymmetric option allows users to customize the number of exposures for each part independently.
EV bias step. In exposure capture mode, users can customize the number of images per bracket and the exposure bias between consecutive exposures. The default step is set at 0.1 F-Stops, but with this option, you have the flexibility to define the optimal exposure bias step according to your preferences.
Capture and playback
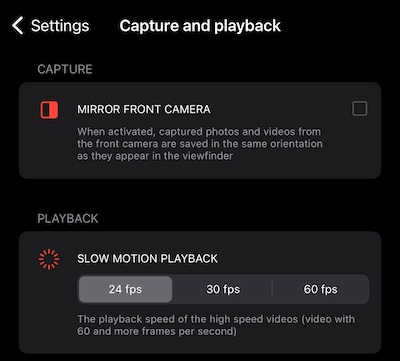
Enhance your user experience by adjusting settings within the Capture and Playback group, which govern the capture of images and playback of videos on the preview screen.
Mirror front camera. When using the front camera, images are saved to the camera roll with a horizontal flip by default. Enabling this option ensures that the saved image maintains the same orientation as seen in the viewfinder.
Slow motion playback. Optimize your video preview experience by customizing the playback speed for videos captured at frame rates of 60 frames per second and above using this option.
Widget
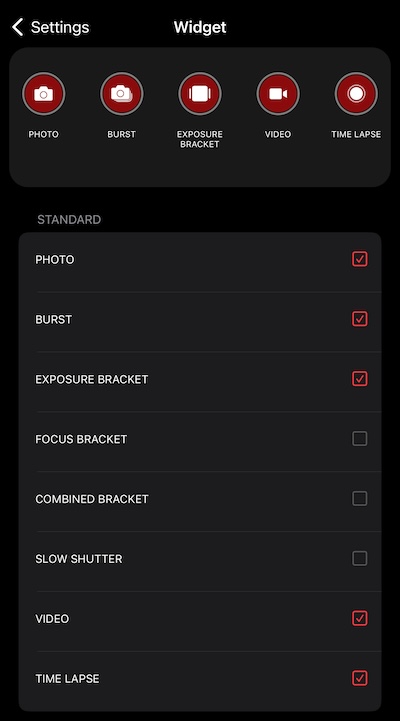
Elevate your iPhone or iPad experience with our Widget, offering swift access to your preferred capture modes right from the home screen.
Customize your Widget with up to 5 capture modes, whether it’s the Standard option or any of your saved Preset modes. Easily rearrange your chosen modes by tapping and dragging within the Widget preview. If you want to remove a capture mode, simply deselect it from the list. Streamline your workflow with our intuitive Widget functionality.
Advanced features
When employing manual controls for adjusting focus and exposure, gauging whether an image is properly focused or exposed can be challenging. CameraPixels app offers advanced functionalities, including focus peaking, loupe, and clipping warnings, ensuring precision in your chosen settings.
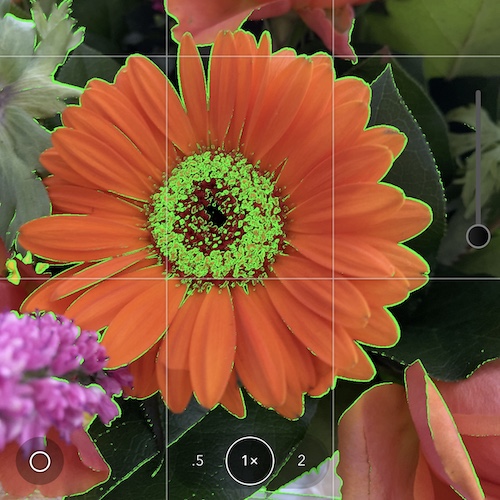
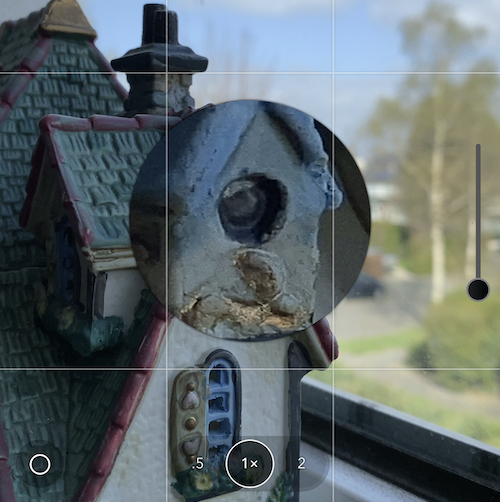
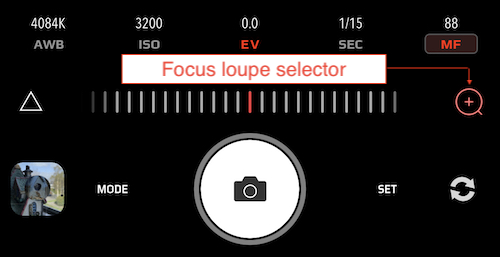
Focus peaking and loupe
With focus peaking, critical focus areas are highlighted, while the loupe provides a magnified view of the image at the center of the viewfinder, aiding in accurate assessment.
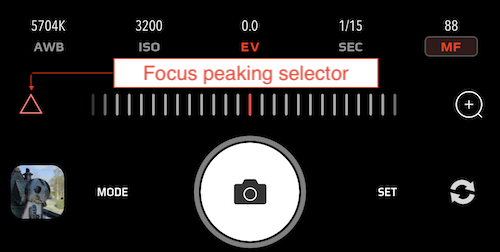
The focus peaking and loupe feature three states each: off, transient (visible during manual focus adjustments), and permanent (displayed as long as the manual focus setting is active). To toggle the focus peaking state, utilize the left-side button on the value selector, while the right-side button controls the loupe state.
Clipping warnings
As previously indicated, the clipping warnings display the underexposed areas (in blue) and overexposed areas (in red) within the image.
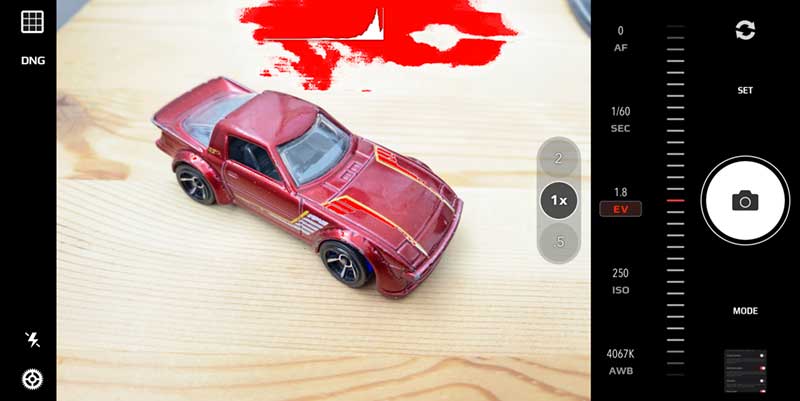
The clipping warnings are displayed continuously, not just when adjusting exposure settings. To save you from repeatedly navigating to the Global Settings dialog to make changes, we’ve introduced a shortcut for seamlessly toggling the clipping warnings on and off. Simply tap on the histogram view! This enhancement streamlines your workflow and ensures a more efficient experience.
Volume buttons to capture
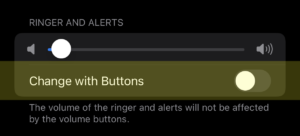
CameraPixels facilitates capturing photos and initiating video recording by pressing either of the volume buttons. For this feature to function properly, a specific setting on your iPhone/iPad needs to be disabled. If you encounter issues with the volume buttons not working in CameraPixels for capturing photos, please follow the steps below:
- Open Settings app on your iPhone

- Select Sounds & Haptics item
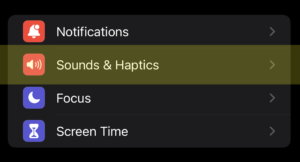
- Switch off the “Change with Buttons” option in “Ringer and Alerts” group
Conclusion
In this tutorial, we’ve explored the customization options of CameraPixels to cater to your specific requirements. Discover how to effortlessly toggle the display of the histogram and zoom slider, prevent CameraPixels from initiating in the default capture mode with default settings, and easily access support when needed. Stay tuned for our upcoming tutorial, where we’ll delve into the fundamental interactions with CameraPixels.
I have iPhone 15. The main camera lens has a resolution of up to 48 megapixels. Will your Pro version of this app export up to 48?
I’m having trouble getting good focus bracketing. I think the problem is that I’m assuming the minimum and maximum distance settings are in centimetres. Am I using the wrong units? If I set a sufficient range to get the whole subject in focus I’m getting a lot of ghosting in the stacked image. Any suggestions?
The distances are represented using unitless values: 0 indicates the closest distance a particular camera can focus on, while 100 typically represents infinity. To generate an effective focus stack, it’s advisable to employ manual focus to determine the minimum and maximum focusing distances. Secure your phone on a tripod or using alternative stabilization methods, and adjust the focus until the nearest part of your subject is in focus – this establishes your minimum focusing distance. Then, adjust the focus until the farthest part of the subject is in focus – this establishes your maximum focusing distance. Modify the number of images per stack according to the range of distances.
Hi, just purchased the CameraPixels package and I’m wondering if it’s possible to add widgets to the iPhone screen or Lock Screen? Thanks.
At present, you can only add a Widget on one of the screens, but not the lock screen. We’ll add that functionality soon
Hi, I just purchased the enhancement pack from within CameraPixels Lite, but in the App Store, I still appear to have the Lite version and not the Pro. Is this the same? The Lite version with the enhancement pack is the same as the Pro version?
Hi Greg, yes, once you purchase IAP from within the Lite version it becomes the Pro version. The difference between Lite and Pro is only in maximum resolution of the output photos and videos. Lite also doesn’t support RAW/ProRAW since they are only available in full resolution