
Introduction
Prior to iOS 10, iPhone devices were capable of shooting only JPEG and TIFF (using a third-party app). Starting from iOS 10, iPhone 6S and newer devices have got raw capture capabilities. This blog post is not about raw, but rather JPEG and TIFF formats, how do they differ, what advantages and disadvantages do they have.
Let us start by ruining one of the common belief "TIFF is the 'raw' RGB pixels, which are not processed by image processing pipeline of an iPhone". Yes, this belief was and still is quite common on various iPhone photography related forums. Here is bad news for you, TIFF and JPEG images are both pre-processed (and sometimes heavily) by the same image processing pipeline. The difference is, of course in the compression applied to the image before saving, and that's were TIFF is winning... or is it not?
TIFF
Let's first have a look at what type of TIFF images we can get from an iPhone. As was mentioned above, you can capture photos in TIFF format only by using a third-party app and this should come as no surprise to you, CameraPixels is one of them. On iOS, the TIFF images can be saved without any compression at all or with a lossless compression, called LZW. In both cases, the original image data is fully preserved. The file size of the non-compressed TIFF is stable and depends only on the currently selected resolution (for maximum resolution of 12.2 MPx the file size is almost 37 MB). On the other hand, LZW-compressed TIFF may have a different output file size and depends on the content of the captured scene. The more details and textured object scene has, the larger the output file will be.
- "Which version of TIFF to choose?"
- "Of course the compressed one, it has a smaller file size and still preserves all the original image data"
Before choosing the right version take into account the following: the advantage of the non-compressed TIFF is that it doesn't require time and CPU resources for compression, while the disadvantage is, of course, the final file size. For LZW TIFF, the advantages and disadvantages are reverted - smaller file size (advantage) but require time and CPU resources for compression (disadvantage). On iPhone 7 Plus, LZW compression of a full-resolution TIFF image takes around 0.7-0.8 seconds.
The TIFF file format on iPhones usually saves images in RGB color space with 8-bits per channel (24 or 32 bits per pixels, depending on the presence of alpha channel). There is also a possibility to save 16-bit per channel TIFF images (48 or 64 bits per pixel), but in standard capture mode, there is no advantage to use additional precession, since the original data from the camera comes in 8-bits per channel format.
JPEG
To capture JPEG images you can use a standard iPhone camera app, but there is a catch (there is always one ;D). The standard iPhone camera app uses a fixed JPEG quality setting and chroma sub-sampling. Wow, wow, wow hold on, the quality of JPEG is understandable - higher quality, better the output image (fewer compression artifacts). But what on Earth is chroma sub-sampling?
JPEG is a lossy image file format, which means that JPEG sacrifices quality for smaller file sizes. Unlike the TIFF file format, JPEG uses the YCbCr color space that is composed of luma component (Y) and chroma components (CbCr). The JPEG compression algorithm takes advantage of the limitations of the human eye. It reduces the original image size by discarding additional information and detail that may not be as noticeable to the human observer.
Prior research has shown that a human eye is much more sensitive to changes in luminance (brightness) than to chrominance (color) differences. Therefore, the JPEG algorithm usually discards mostly color information, while trying to preserve the luminance information.
Chroma subsampling is the practice of encoding images by implementing less resolution for chroma information than for luma information, taking advantage of the human visual system's lower acuity for color differences than for luminance (from Wikipedia). There are several chroma sub-sampling schemes that exist, but on iPhone two are more common: 4:4:4 and 4:2:0.
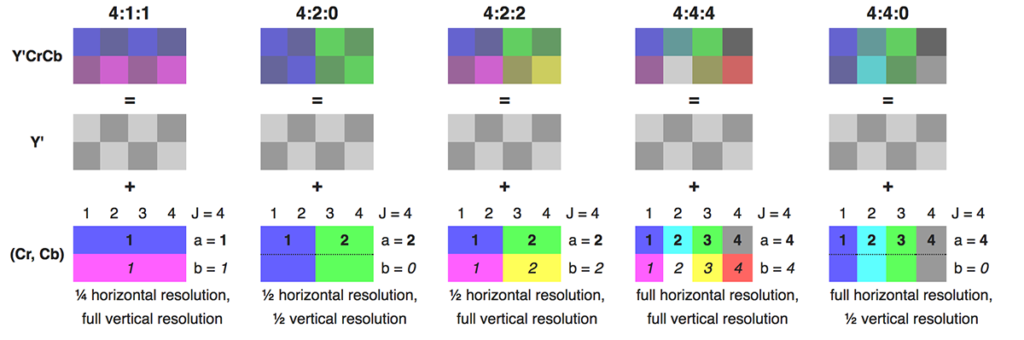
The chroma sub-sampling scheme is expressed as a three-part ratio J:a:b (e.g. 4:2:2), which describes the number of luminance and chrominance samples in a conceptual region that is J pixels wide, and 2 pixels high.
J: horizontal sampling reference (width of the conceptual region). Usually, 4.
a: number of chrominance samples (Cr, Cb) in the first row of J pixels.
b: number of changes of chrominance samples (Cr, Cb) between the first and second row of J pixels.
The standard camera app on the iPhone uses 4:2:0 chroma sub-sampling. In CameraPixels one may choose what chroma sub-sampling scheme to use in Photo capture mode for output JPEG images. If JPEG compression is set to MAX, then the app uses 4:4:4 chroma sub-sampling scheme, for all other levels of compression it uses 4:2:0 scheme.
- 4:2:0 - With respect to the information in the luminance channel (Y), the chrominance resolution in both the horizontal and vertical directions is cut in half.
- 4:4:4 - The resolution of chrominance information (Cb & Cr) is preserved at the same rate as the luminance (Y) information (or subsampling disabled).
Because of the amount of information stored using 4:4:4 chroma sub-sampling scheme, the output file size may be up to 4x larger than those using 4:2:0 scheme.
It has to be noted that, JPEG with 4:4:4 chroma sub-sampling scheme uses a software encoder, that heavily utilizes CPU for processing, while JPEG with 4:2:0 uses hardware-accelerated encoder, that almost doesn't consume CPU processing power.
TIFF vs JPEG MAX vs JPEG
Now that we know what type of TIFF and JPEG images can be captured with CameraPixels on iPhone, it's time to answer the question of this post "JPEG or TIFF: that is the question"?
Since the TIFF is a lossless format, it should be the preferred one for those photos that are expected to be post-processed. The JPEG is more suited for photos that are not expecting heavy post-processing or when storage space is limited. But don't jump to a conclusion just yet. Let's try to compress the same image using TIFF, JPEG MAX (4:4:4 chroma), and JPEG 100% (4:2:0 chroma) and see the differences. The TIFF image will be the reference since it's a lossless image format and preserves all the original image data.
The original image was captured in RGB format at 640x480 pixels on iPhone 7 Plus (wide lens).
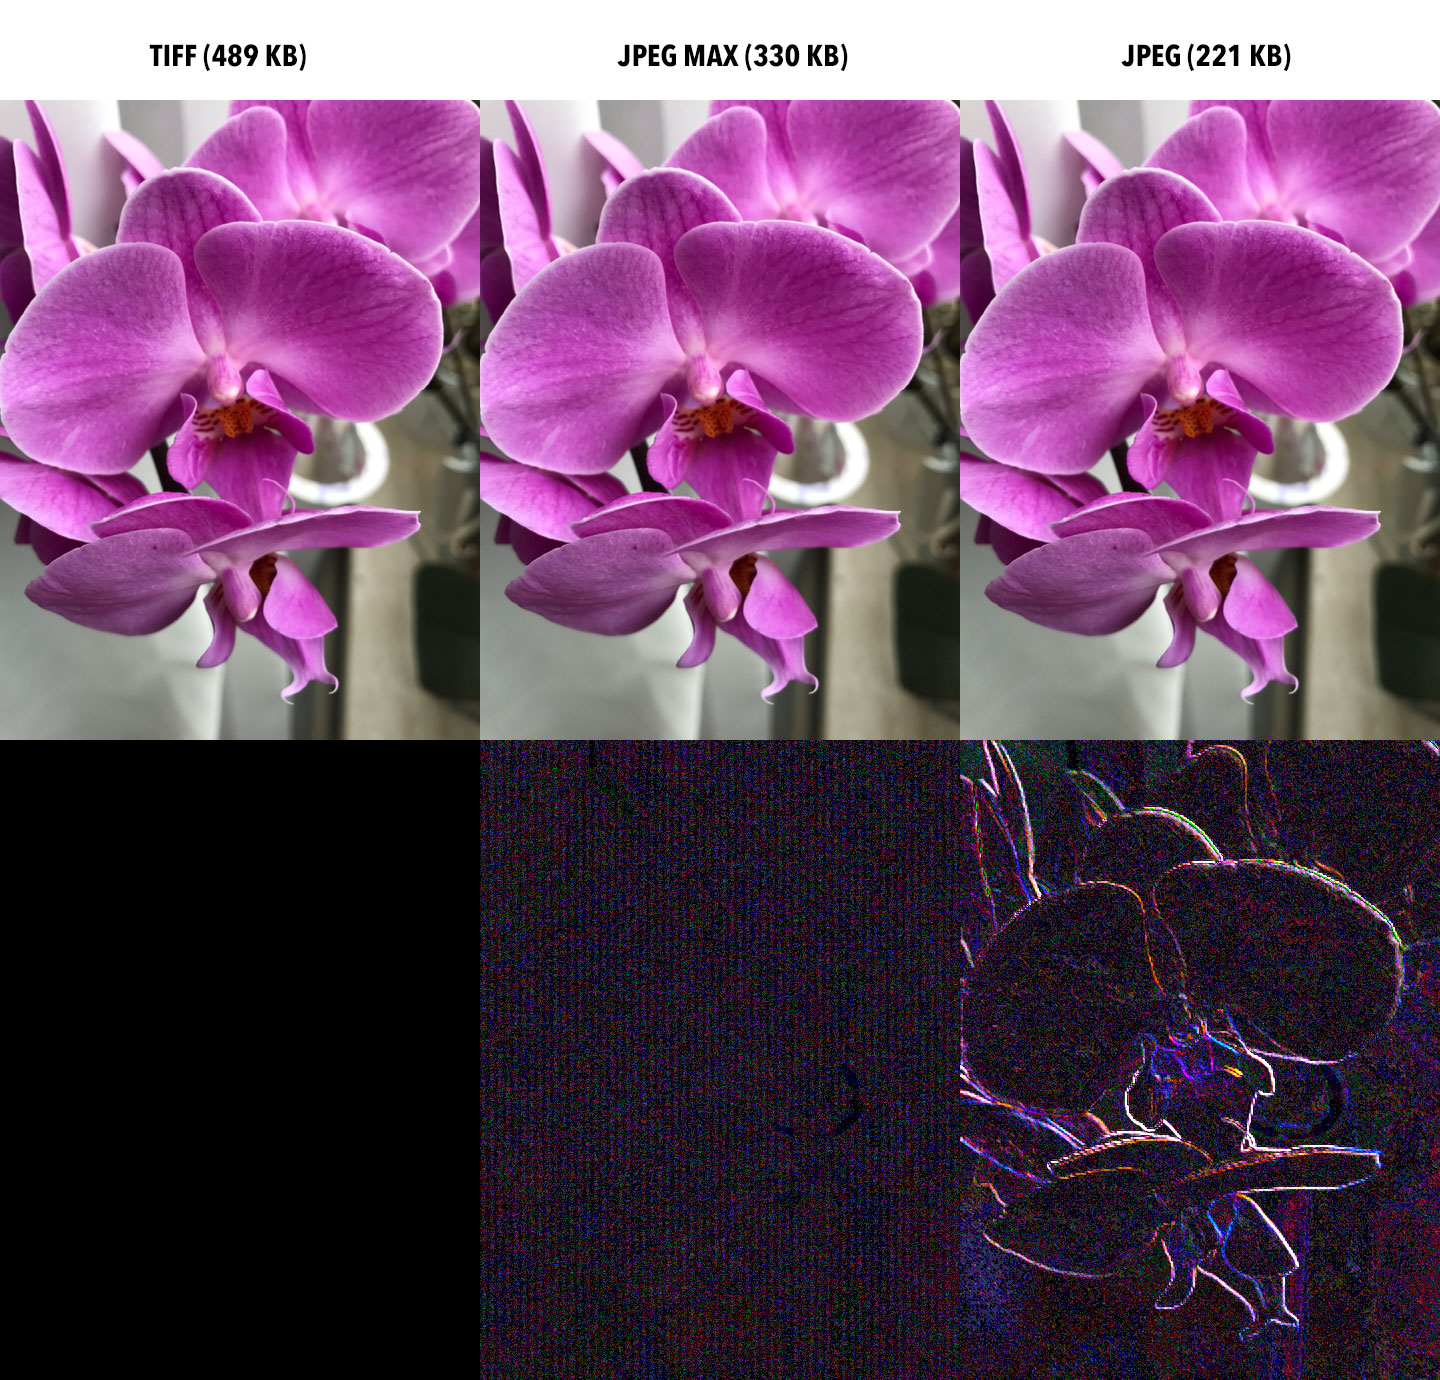

To visualize the difference images, the window/level operation has been applied with Window equals to 6 and Level equals to 3 (means that values from 0 to 6 were linearly scaled to the whole range of 0...255 values). As one can see from the above examples, JPEG MAX almost perfectly repeating the LZW TIFF image. With the standard JPEG (with chroma 4:2:0 scheme and quality set to 100%), there are some differences at the edges of objects. Even though the differences are not easily seen for both types of JPEG compression, one would want to prefer JPEG MAX or TIFF over standard JPEG when the captured image will be printed at a relatively large size. During the image enlargement compression artifacts may become more apparent.
Conclusion
From the above examples one can see, that JPEG MAX may replace the TIFF format in many situations, producing very similar results, while taking 1/3 of the time and 60% of storage of the compressed TIFF. The TIFF and JPEG MAX formats are well suited for cases when the highest quality of images is desirable and the captured scene is not very dynamic. For dynamic scenes prefer standard 100% JPEG output.
But how does the JPEG max compare to Heic Max .So far that's what I've been using on iPhone 15 and then using an online converter to TIFF so I can work on it in Photoshop CS 3, And I've read other places that it's better than JPEG. If so I wonder why you don't mention that in this article.