
In the preceding lesson, we explored the intricacies of the user interface and the configuration of CameraPixels to suit your preferences. In this tutorial, we'll delve into fundamental interactions within CameraPixels, covering topics such as adjusting focus and exposure points, and manually fine-tuning focus, white balance, and exposure settings.
Adjusting focus and exposure points
The CameraPixels viewfinder accommodates four primary gestures for user interaction:
- Single-tap using one finger
- Single-tap using two fingers
- Double-tap with one finger
- Press-and-drag
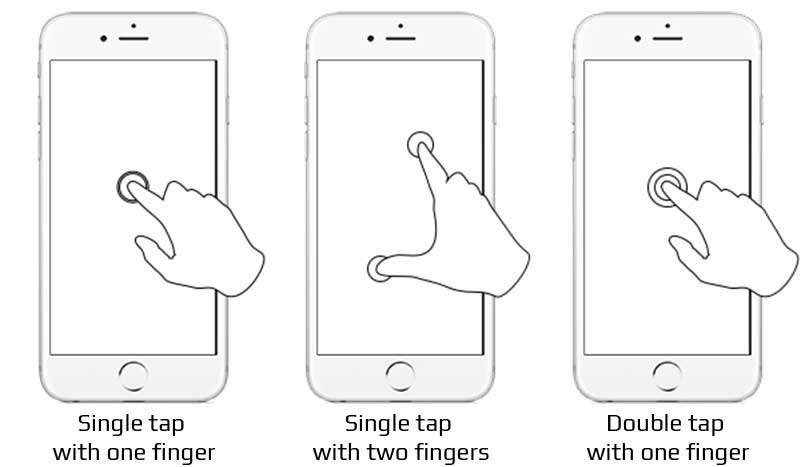
Gesture - single tap with one finger
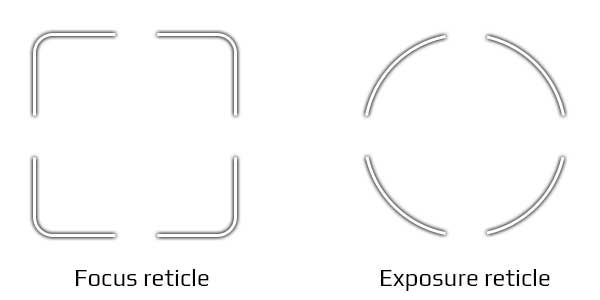
To effortlessly control both focus and exposure points simultaneously, simply tap the screen with a single finger gesture. When both focus and exposure points are customizable, a square reticle will appear on your screen. In cases where only the exposure point is adjustable, as seen with most front cameras on iOS devices, a circle reticle will be displayed on the screen.
Instead of relying on screen taps to change focus and exposure points, leverage the press and drag gesture. Simply press atop the focus/exposure reticle and drag it to your preferred focus or exposure measurement point.
Gesture - single tap with two fingers
By default, CameraPixels combines focus and exposure points, adjusting both simultaneously with a single-finger tap on the screen. However, for more precise control, our app allows the independent adjustment of focus and exposure points. To achieve this separation, utilize a two-finger tap or a pinch-to-zoom gesture. It's important to note that this feature is available only when both focus and exposure are in auto-mode, and the camera and capture mode support these individual adjustments. Once separated, each point can be fine-tuned individually using a press-and-drag gesture. To reunite focus and exposure points, simply tap the viewfinder with a single finger. Please be aware that if either focus or exposure is in manual mode, the corresponding reticle is hidden and can't be adjusted using on-screen gestures.
Gesture - double tap with one finger
To effortlessly return the focus and exposure modes to automatic settings, and center the focus and exposure points within the viewfinder, simply employ the one-finger double-tap gesture. This intuitive action not only resets the exposure point but also seamlessly transitions the metering mode from Spot back to to Center-weighted.
Manual adjustments
Experience enhanced mobile photography with CameraPixels, meticulously crafted and fine-tuned for optimal performance on your device. Our user-friendly interface ensures effortless access to manual settings, with a dedicated toolbar that remains visible on your screen. Stay informed about your camera's key parameters, including ISO, shutter speed, white balance, and focus, all constantly updated in real-time.
Empower yourself to make informed photography decisions by choosing between auto mode or seamlessly transitioning to manual settings. Take full advantage of the manual adjustments available on most iOS devices, allowing you to customize ISO, shutter speed, exposure bias offset, white balance, and focus. Please note that the aperture is consistently fixed across all currently supported iOS devices.
Manual white balance adjustments
To manually adjust the white balance on your device, simply press the White Balance setting button. In automatic mode, this button is labeled AWB (auto white balance), whereas in manual mode, it changes to WB. Additionally, the label color shifts from light grey in auto mode to red in manual mode.

To explore white balance presets and make tint adjustments, simply perform a long press on the White Balance setting button. If you possess a calibration grey card, position it in front of the camera to cover at least 50% of the viewfinder. Then, press the Grey card button within the white balance presets dialog.
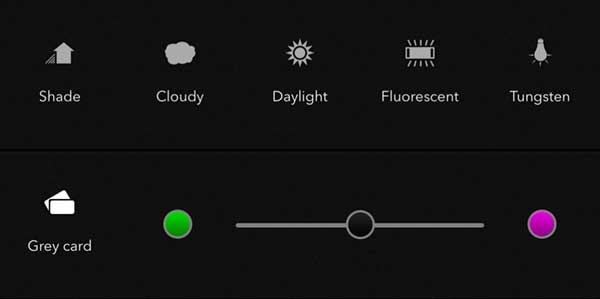
To hide the white balance presets dialog, select one of the options or tap outside the dialog.
To revert the white balance mode to auto mode, double-tap the white balance setting button when it's highlighted (indicated by a selection border around the button's label).
Manual iso and shutter speed adjustments
Pressing the ISO setting button in CameraPixels will transition the exposure mode to manual or semi-manual, depending on your CameraPixels settings, and will highlight ISO and potentially shutter speed settings.
By default, CameraPixels is set up to accommodate semi-manual (priority) modes, namely ISO- and shutter-priority. Unless you've deactivated the ISO/Shutter priority option in CameraPixels' global settings, pressing the ISO or shutter speed setting buttons will switch the app to ISO- or shutter-priority mode, respectively. In these priority modes, you can fine-tune ISO or shutter speed along with exposure bias offset, while CameraPixels automatically calculates the corresponding exposure setting.
To revert ISO or shutter speed to auto mode, simply double-tap the relevant setting button when it's selected.
For swift transitions to ISO or shutter-priority mode (assuming you've enabled priority modes support in Global settings), perform a long press on the corresponding setting button. A prolonged press on the ISO button activates ISO-priority mode, while the shutter speed button initiates shutter-priority mode.
If you prefer not to use priority modes, you can disable the ISO/Shutter priority option in CameraPixels' global settings. In this scenario, pressing the ISO or shutter speed setting buttons will simultaneously select both ISO and shutter speed settings, preventing adjustments to the exposure bias setting. Additionally, resetting either setting will restore the exposure mode to auto mode.
Under certain conditions, the ISO and shutter speed settings may appear greyed out. This signifies that manual exposure is not supported for the chosen output, camera selection, capture mode, or resolution. For example, when using the 1.0x camera and selecting a 48MPx resolution on the iPhone 14/15 Pro Max, manual exposure is not available.
Manual focus adjustments
To manually adjust the focus, simply tap on the focus setting button, causing its label to transition from AF (auto-focus) to MF (manual focus).
The focus is represented as a unitless value to accommodate the varying focus distances influenced by the specific camera and lenses attached to your iPhone. This unitless representation allows CameraPixels to encompass a wide range of scenarios, where 0 denotes the closest distance the camera can focus on, and 100 signifies the furthest focusable point. The closest focusing distance can range from a few millimeters (e.g., with a macro lens attached to the iPhone camera or 0.5x camera on iPhone 14/15 Pro/Max) to a few centimeters.
To return the focus to auto mode, perform a double-tap on the focus setting button while it's highlighted.
The availability of the focus setting may be restricted under certain conditions. For example, it might be unavailable when the app employs a virtual camera for capturing Portrait images or when the camera is fixed-focus.
Exposure bias adjustments
Exposure bias offset is likely the sole setting that can be modified in every capture mode and for all cameras accessible on iOS devices. The only instance where exposure bias offset is unalterable is when the exposure mode is set to full manual mode, where both ISO and shutter speed are manually selected.
Exposure bias can be fine-tuned with a precision of 0.1 F-stop. Resetting the exposure bias to 0.0 is as simple as double-tapping on the EV button. Alternatively, initiating a long press on the EV button will shift the exposure mode back to auto.
Conclusion
In this lesson, we explored fundamental interactions within CameraPixels. By now, you should be adept at adjusting focus and exposure points, toggling between manual and auto modes for exposure, focus, and white balance. Additionally, we touched upon some handy shortcuts for swiftly transitioning between exposure modes:
- A prolonged press on the ISO button shifts CameraPixels into iso-priority mode.
- A prolonged press on the shutter speed button transitions CameraPixels into shutter-priority mode.
- A prolonged press on the EV button switches CameraPixels to auto-exposure mode.
To access the white balance presets and tint adjustments, initiate a long press on the white balance setting button.
I just purchased the Pro version. I cannot find any tutorials on how to use the focus bracketing tool. Apparently it automatically takes 5 exposures - I cannot find any way to adjust the focus range or number of exposures - is that possible? Thanks
Focus bracketing by default is set to capture 5 images, but the number of images can be adjusted in capture mode settings (button SET, scroll the list of settings down to Focus Bracket section)